Vue 是如何用 Rollup 打包的?
Rollup 是一个 JavaScript 模块打包器,它将小块的代码编译并合并成更大、更复杂的代码,比如打包一个库或应用程序。它使用的是 ES Modules 模块化标准,而不是之前的模块化方案,如 CommonJS 和 AMD。ES 模块可以让你自由、无缝地使用你最喜爱库中那些最有用的独立函数,而让你的项目无需包含其他未使用的代码。
近期在团队内组织学习 Rollup 专题,在着重介绍了 Rollup 核心概念和插件的 Hooks 机制后,为了让小伙伴们能够深入了解 Rollup 在实际项目中的应用。我们就把目光转向了优秀的开源项目,之后就选择了尤大的 vue/Vite/Vue3 项目,接下来本文将先介绍 Rollup 在 Vue 中的应用。
dev 命令
在 vue-2.6.14 项目根目录下的 package.json 文件中,我们可以找到 scripts 字段,在该字段内定义了如何构建 Vue 项目的相关脚本。
{
  "name": "vue",
  "version": "2.6.14",
  "sideEffects": false,
  "scripts": {
    "dev": "rollup -w -c scripts/config.js --environment TARGET:web-full-dev",
    "dev:cjs": "rollup -w -c scripts/config.js --environment TARGET:web-runtime-cjs-dev",
    ...
}
这里我们以 dev 命令为例,来介绍一下与 rollup 相关的配置项:
- -c:指定 rollup 打包的配置文件;
- -w:开启监听模式,当文件发生变化的时候,会自动打包;
- --environment:设置环境变量,设置后可以通过 process.env 对象来获取已配置的值。
由 dev 命令可知 rollup 的配置文件是 scripts/config.js:
// scripts/config.js
// 省略大部分代码
if (process.env.TARGET) {
  module.exports = genConfig(process.env.TARGET)
} else {
  exports.getBuild = genConfig
  exports.getAllBuilds = () => Object.keys(builds).map(genConfig)
}
观察以上代码可知,当 process.env.TARGET 有值的话,就会根据 TARGET 的值动态生成打包配置对象。
// scripts/config.js
function genConfig (name) {
  const opts = builds[name]
  const config = {
    input: opts.entry,
    external: opts.external,
    plugins: [
      flow(),
      alias(Object.assign({}, aliases, opts.alias))
    ].concat(opts.plugins || []),
    output: {
      file: opts.dest,
      format: opts.format,
      banner: opts.banner,
      name: opts.moduleName || 'Vue'
    },
    onwarn: (msg, warn) => {
      if (!/Circular/.test(msg)) {
        warn(msg)
      }
    }
  }
  // 省略部分代码
  return config
}
在 genConfig 函数内部,会从 builds 对象中获取当前目标对应的构建配置对象。当目标为 'web-full-dev' 时,它对应的配置对象如下所示:
// scripts/config.js
const builds ={
  'web-runtime-cjs-dev': { ... },
  'web-runtime-cjs-prod': { ... },
  // Runtime+compiler development build (Browser)
  'web-full-dev': {
    entry: resolve('web/entry-runtime-with-compiler.js'),
    dest: resolve('dist/vue.js'),
    format: 'umd',
    env: 'development',
    alias: { he: './entity-decoder' },
    banner
  },
}
在每个构建配置对象中,会定义 entry(入口文件)、dest (输出文件)、format(输出格式)等信息。当获取构建配置对象后,就根据 rollup 的要求生成对应的配置对象。
需要注意的是,在 Vue 项目的根目录中是没有 web 目录的,该项目的目录结构如下所示:
├── BACKERS.md
├── LICENSE
├── README.md
├── benchmarks
├── dist
├── examples
├── flow
├── package.json
├── packages
├── scripts
├── src
├── test
├── types
└── yarn.lock
那么 web/entry-runtime-with-compiler.js 入口文件的位置在哪呢?其实是利用了 rollup 的 @rollup/plugin-alias 插件为地址取了个别名。具体的映射规则被定义在 scripts/alias.js 文件中:
// scripts/alias.js
const path = require('path')
const resolve = p => path.resolve(__dirname, '../', p)

module.exports = {
  vue: resolve('src/platforms/web/entry-runtime-with-compiler'),
  compiler: resolve('src/compiler'),
  core: resolve('src/core'),
  shared: resolve('src/shared'),
  web: resolve('src/platforms/web'),
  weex: resolve('src/platforms/weex'),
  server: resolve('src/server'),
  sfc: resolve('src/sfc')
}
根据以上的映射规则,我们可以定位到 web 别名对应的路径,该路径对应的文件结构如下:
├── compiler
├── entry-compiler.js
├── entry-runtime-with-compiler.js
├── entry-runtime.js
├── entry-server-basic-renderer.js
├── entry-server-renderer.js
├── runtime
├── server
└── util
到这里结合前面介绍的 builds 对象,相信你也知道了 Vue 是如何打包不同类型的文件,以满足不同场景的需求,比如含有编译器和不包含编译器的版本。分析完 dev 命令的处理流程,下面我来分析 build 命令。
build 命令
同样,在根目录下 package.json 的 scripts 字段,我们可以找到 build 命令的定义:
{
  "name": "vue",
  "version": "2.6.14",
  "sideEffects": false,
  "scripts": {
    "build": "node scripts/build.js",
    ...
}
当你运行 build 命令时,会使用 node 应用程序执行 scripts/build.js 文件:
// scripts/build.js
let builds = require('./config').getAllBuilds()

// filter builds via command line arg
if (process.argv[2]) {
  const filters = process.argv[2].split(',')
  builds = builds.filter(b => {
    return filters.some(f => b.output.file.indexOf(f) > -1
    || b._name.indexOf(f) > -1)
  })
} else {
  // filter out weex builds by default
  builds = builds.filter(b => {
    return b.output.file.indexOf('weex') === -1
  })
}

build(builds)
在 scripts/build.js 文件中,会先获取所有的构建目标,然后根据进行过滤操作,最后再调用 build 函数进行构建操作,该函数的处理逻辑也很简单,就是遍历构建列表,然后调用 buildEntry 函数执行构建操作。
// scripts/build.js
function build (builds) {
  let built = 0
  const total = builds.length
  const next = () => {
    buildEntry(builds[built]).then(() => {
      built++
      if (built < total) {
        next()
      }
    }).catch(logError)
  }

  next()
}
当 next 函数执行时,就会开始调用 buildEntry 函数,在该函数内部就是根据传入了配置对象调用 rollup.rollup api 进行构建操作:
// scripts/build.js
function buildEntry (config) {
  const output = config.output
  const { file, banner } = output
  const isProd = /(min|prod)\.js$/.test(file)
  return rollup.rollup(config)
    .then(bundle => bundle.generate(output))
    .then(({ output: [{ code }] }) => {
      if (isProd) { // 若为正式环境,则进行压缩操作
        const minified = (banner ? banner + '\n' : '')
    + terser.minify(code, {
          toplevel: true,
          output: {
            ascii_only: true
          },
          compress: {
            pure_funcs: ['makeMap']
          }
        }).code
        return write(file, minified, true)
      } else {
        return write(file, code)
      }
    })
}
当打包完成后,下一个环节就是生成文件。在 buildEntry 函数中是通过调用 write 函数来生成文件:
// scripts/build.js
const fs = require('fs')

function write (dest, code, zip) {
  return new Promise((resolve, reject) => {
    function report (extra) {
      console.log(blue(path.relative(process.cwd(), dest))
     + ' ' + getSize(code) + (extra || ''))
      resolve()
    }

    fs.writeFile(dest, code, err => {
      if (err) return reject(err)
      if (zip) {
        zlib.gzip(code, (err, zipped) => {
          if (err) return reject(err)
          report(' (gzipped: ' + getSize(zipped) + ')')
        })
      } else {
        report()
      }
    })
  })
}
write 函数内部是通过 fs.writeFile 函数来生成文件,该函数还支持 zip 参数,用于输出经过 gzip 压缩后的大小。现在我们已经分析完了 dev 和 build 命令,最后我们来简单介绍一下构建过程中所使用的一些核心插件。
rollup 插件
在 package.json 文件中,我们可以看到 Vue2 项目中用到的 rollup 插件:
// package.json
{
  "name": "vue",
  "version": "2.6.14",
  "devDependencies": {
    "rollup-plugin-alias": "^1.3.1",
    "rollup-plugin-buble": "^0.19.6",
    "rollup-plugin-commonjs": "^9.2.0",
    "rollup-plugin-flow-no-whitespace": "^1.0.0",
    "rollup-plugin-node-resolve": "^4.0.0",
    "rollup-plugin-replace": "^2.0.0",
  }
}
其中,"rollup-plugin-alias" 插件在前面我们已经知道它的作用了。而其他插件的作用如下:
- rollup-plugin-buble:该插件使用 buble 转换 ES2015 代码,它已经被移到新的仓库 @rollup/plugin-buble;
- rollup-plugin-commonjs:该插件用于把 CommonJS 模块转换为 ES6 Modules,它已经移到新的仓库 @rollup/plugin-commonjs;
- rollup-plugin-flow-no-whitespace:该插件用于移除 flow types 中的空格;
- rollup-plugin-node-resolve:该插件用于支持使用 node_modules 中第三方模块,会使用 Node 模块解析算法来定位模块。它也被移动到新的仓库 @rollup/plugin-node-resolve;
- rollup-plugin-replace:该插件用于在打包时执行字符串替换操作,它也被移动到新的仓库 @rollup/plugin-replace。
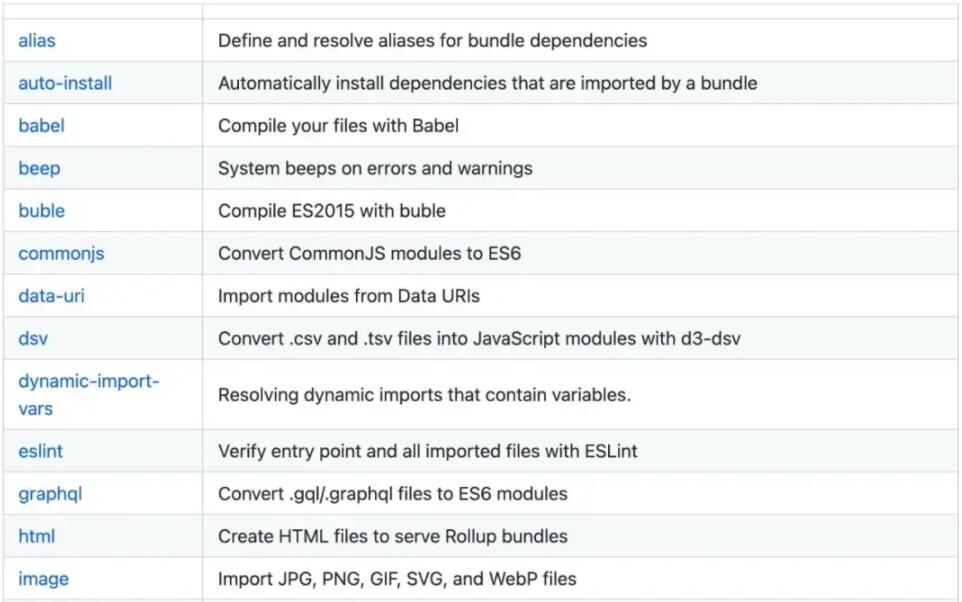
除了以上的插件,在实际的项目中,你也可以使用 Rollup 官方仓库提供的插件,来实现对应的功能,具体如下图所示(仅包含部分插件):

(来源:https://github.com/rollup/plugins)
作者:阿宝哥,https://mp.weixin.qq.com/s/qU741y8QfEPsDhqvWAZTIA
本文内容仅供个人学习、研究或参考使用,不构成任何形式的决策建议、专业指导或法律依据。未经授权,禁止任何单位或个人以商业售卖、虚假宣传、侵权传播等非学习研究目的使用本文内容。如需分享或转载,请保留原文来源信息,不得篡改、删减内容或侵犯相关权益。感谢您的理解与支持!
