小程序组件开发_小程序实现自定义组件的多种方式
组件开发可以使代码的可复用性强,是指一些设计为通用性的,用来构建较大型应用程序。在小程序中,目前也支持简单的组件化编程,可以把页面通用功能模块抽象成自定义组件,以以便在不同的页面中复用,提供代码可读性,降低维护成本,这篇文章主要讲解小程序实现组件开发的2种方式
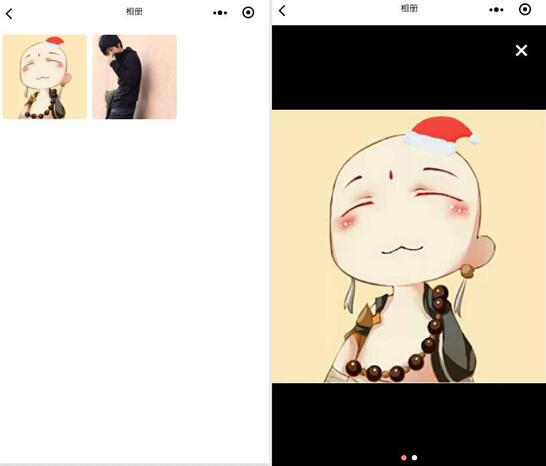
首先需要在根目录下新建一个文件夹components,用于存放组件模块。下面就以实现图片查看器来进行说明,效果图如下:

方式一:
在components目录下新建picture文件夹,生成对应js、json、wxml、wxss文件。然后里面的内容分别是:
picture.wxml文件:
<view class="picture" wx:if="{{ishow_pic}}">
  <swiper indicator-dots="true" duration="500" current="{{index_pic}}" indicator-active-color="#FF7D7D" indicator-color="#fff">
    <block wx:for="{{list}}" wx:key="{{key}}">
      <swiper-item>
        <image src='{{item}}' mode="aspectFit"></image>
      </swiper-item>
    </block>
  </swiper>
  <view>
    <image src="/images/icon_Closecall@3x.png"  bindtap="tap_closepic" class="tap_close"></image>
  </view>
</view>
picture.js文件:
Component({
  options: {
    multipleSlots: true
  },
  properties: {
    list: {//图片列表
      type: Array,
      value:[]
    },
    index_pic: {//显示当前下标
      type: Number,
      value: 0
    }
  },
  data: {
    ishow_pic:false,//是否显示
  },
  methods: {
    tap_closepic:function(){//显示或隐藏
      this.setData({
        ishow_pic: !this.data.ishow_pic
      })
    },
  }
})
说明:小程序中组件是由Component 构造器生成的,调用 Component 构造器时可以用来指定自定义组件的属性、数据、方法等。
picture. wxss文件:
.picture{
  position: fixed;
  height: 100%;
  width: 100%;
  background: #000;
  top:0;
  left: 0;
  z-index: 99;
}
.picture swiper{
  height: 100%;
  width: 100%;
}
.picture swiper image{
  width: 100%;
  height: 100%;
}
.picture .tap_close{
  width: 80rpx;
  height: 80rpx;
  position: absolute;
  top: 30rpx;
  right: 30rpx;
  z-index: 99999;
}
picture. json文件
{
  "component": true,
  "usingComponents": {}
}
说明:
"component": true, // 自定义组件声明
"usingComponents": {} // 可选项,用于引用别的组件
在index页面中调用:
index.wxml文件中引入如下:
<picture id='picture' list="{{list}}" index_pic="{{index_pic}}"></picture>json中需要配置使用的组件名称,已经路径:
{
  "usingComponents": {
    "picture": "/components/picture/picture"
  }
}
在js中使用:
onLoad: function (options) {
    this.picture = this.selectComponent("#picture") //组件的Id
},
tap_img:function(e){/**点击图片 */
    this.setData({
      index_pic:e.currentTarget.dataset.index,
    })
    this.picture.tap_closepic()
},
方式二:
在picture文件夹,只使用wxml、wxss这2个文件
picture.wxml文件中使用<template>标签来声明为组件。如下:
<template name="picture">
    <!--里面为方式一的代码-->
</template>
picture.wxss文件不变。
在index页面中的调用:
index.wxml文件中引入如下,需要import引入文件
<import src="../../components/picture/picture.wxml"></import>
<template is="picture" data="{{list,ishow_pic,index_pic}}"/>
在index.wxss头部需要引入组件的样式文件:
@import "../../components/picture/picture.wxss";在index.js中需要定义组件中的方法以及变量
data: {
list:[],
index_pic:0,
ishow_pic:false,
//...
},
tap_img:function(e){/**点击图片 */
this.setData({
index_pic:e.currentTarget.dataset.index,
})
},
tap_closepic:function(){//显示或隐藏
this.setData({
ishow_pic: !this.data.ishow_pic
})
},
方式三:
第三方模块实现,比如使用wepy,引入如下:
mport wepy from 'wepy'wepy对组件的支持非常接近vue.js 2.x,比如computed、watcher属性。这里就不做说明,有兴趣的可以去看文档哦。
本文内容仅供个人学习、研究或参考使用,不构成任何形式的决策建议、专业指导或法律依据。未经授权,禁止任何单位或个人以商业售卖、虚假宣传、侵权传播等非学习研究目的使用本文内容。如需分享或转载,请保留原文来源信息,不得篡改、删减内容或侵犯相关权益。感谢您的理解与支持!


