Flutter轮播图制作指南:从零开始实现流畅图片切换
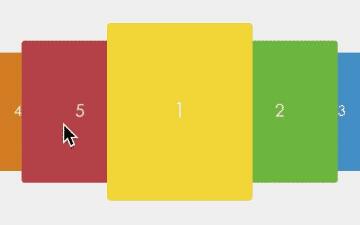
轮播图是现代App中常见的展示方式,常用于商品展示、活动推广等场景。在Flutter中,我们可以用PageView组件轻松实现这个功能。下面将详细介绍如何制作一个实用的轮播图。
轮播图的基本组成
一个完整的轮播图通常包含:可以左右滑动的图片区域
显示当前页码的指示器
流畅的切换动画效果
良好的错误处理机制
开始制作轮播图
首先创建主组件:
import 'package:flutter/material.dart';
import './ImagePage.dart';

class PageviewSwiper extends StatefulWidget {
  @override
  _PageviewSwiperState createState() => _PageviewSwiperState();
}

class _PageviewSwiperState extends State<PageviewSwiper> {
  List<Widget> _imageList = [];
  int _currentPageIndex = 0;
  final int _maxPageCount = 1000;

  @override
  void initState() {
    super.initState();
    _loadImages();
  }

  void _loadImages() {
    List<String> imageUrls = [
      "https://fly63.com/300?random=1",
      "https://fly63.com/300?random=2",
      "https://fly63.com/300?random=3",
    ];

    _imageList = imageUrls.map((url) => ImagePage(src: url)).toList();
    setState(() {});
  }

  @override
  Widget build(BuildContext context) {
    return Scaffold(
      appBar: AppBar(
        title: Text("图片轮播"),
        leading: IconButton(
          icon: Icon(Icons.arrow_back),
          onPressed: () => Navigator.of(context).pop(),
        ),
      ),
      body: _buildContent(),
    );
  }
}
构建主要内容
Widget _buildContent() {
  if (_imageList.isEmpty) {
    return Center(
      child: Column(
        mainAxisAlignment: MainAxisAlignment.center,
        children: [
          CircularProgressIndicator(),
          SizedBox(height: 16),
          Text('正在加载图片...'),
        ],
      ),
    );
  }

  return Stack(
    children: [
      _buildCarousel(),
      _buildPageIndicator(),
    ],
  );
}
实现轮播功能
无限轮播的原理很简单:设置足够多的页面数量,通过取模运算让图片循环显示。
Widget _buildCarousel() {
  return SizedBox(
    height: 250,
    child: PageView.builder(
      onPageChanged: (index) {
        setState(() {
          _currentPageIndex = index % _imageList.length;
        });
      },
      itemCount: _maxPageCount,
      itemBuilder: (context, index) {
        return _imageList[index % _imageList.length];
      },
    ),
  );
}
添加页码指示器
用户需要知道当前查看的是第几张图片。我们在底部添加一个指示器:
Widget _buildPageIndicator() {
  return Positioned(
    left: 0,
    right: 0,
    bottom: 20,
    child: Column(
      children: [
        Container(
          padding: EdgeInsets.symmetric(horizontal: 12, vertical: 6),
          decoration: BoxDecoration(
            color: Colors.black54,
            borderRadius: BorderRadius.circular(12),
          ),
          child: Text(
            '${_currentPageIndex + 1}/${_imageList.length}',
            style: TextStyle(color: Colors.white, fontSize: 12),
          ),
        ),
        SizedBox(height: 8),
        Row(
          mainAxisAlignment: MainAxisAlignment.center,
          children: List.generate(_imageList.length, (index) {
            return Container(
              width: index == _currentPageIndex ? 20 : 10,
              height: 10,
              margin: EdgeInsets.symmetric(horizontal: 4),
              decoration: BoxDecoration(
                color: index == _currentPageIndex ? Colors.blue : Colors.grey,
                borderRadius: BorderRadius.circular(5),
              ),
            );
          }),
        ),
      ],
    ),
  );
}
制作图片组件
图片加载需要处理各种状态,比如加载中、加载失败等:
class ImagePage extends StatelessWidget {
  final String src;
  final double width;
  final double height;

  const ImagePage({
    required this.src,
    this.width = double.infinity,
    this.height = 200,
  });

  @override
  Widget build(BuildContext context) {
    return Container(
      width: width,
      height: height,
      margin: EdgeInsets.all(12),
      decoration: BoxDecoration(
        borderRadius: BorderRadius.circular(12),
        boxShadow: [
          BoxShadow(
            color: Colors.black12,
            blurRadius: 8,
          ),
        ],
      ),
      child: ClipRRect(
        borderRadius: BorderRadius.circular(12),
        child: Image.network(
          src,
          fit: BoxFit.cover,
          loadingBuilder: (context, child, progress) {
            if (progress == null) return child;
            return Container(
              color: Colors.grey[200],
              child: Column(
                mainAxisAlignment: MainAxisAlignment.center,
                children: [
                  CircularProgressIndicator(),
                  SizedBox(height: 16),
                  Text('图片加载中...'),
                ],
              ),
            );
          },
          errorBuilder: (context, error, stackTrace) {
            return Container(
              color: Colors.grey[100],
              child: Column(
                mainAxisAlignment: MainAxisAlignment.center,
                children: [
                  Icon(Icons.error, color: Colors.red, size: 40),
                  SizedBox(height: 16),
                  Text('图片加载失败'),
                  SizedBox(height: 8),
                  Text('请检查网络连接', style: TextStyle(fontSize: 12)),
                ],
              ),
            );
          },
        ),
      ),
    );
  }
}
实际使用技巧
图片优化
如果使用网络图片,建议对图片进行压缩。大图会影响加载速度,导致卡顿。内存管理
当图片数量很多时,要考虑使用缓存和懒加载,避免内存占用过大。添加自动轮播
可以添加自动切换功能:
Timer? _timer;

void _startAutoPlay() {
  _timer = Timer.periodic(Duration(seconds: 3), (timer) {
    if (_pageController.hasClients) {
      _pageController.nextPage(
        duration: Duration(milliseconds: 500),
        curve: Curves.ease,
      );
    }
  });
}

// 在initState中调用_startAutoPlay()
// 在dispose中调用_timer?.cancel()
处理常见问题
图片加载慢:可以预先加载图片,或者使用本地预览图。
页面卡顿:检查图片大小,过大的图片会导致性能问题。
指示器不更新:确保在onPageChanged回调中调用了setState。
轮播图的应用场景
轮播图不仅用于商品展示,还可以用在很多地方:
新闻App的头条新闻轮播
旅游App的景点展示
电商App的促销活动
社交App的动态展示
每种场景可能需要不同的样式,你可以根据需要调整指示器的样式、切换动画等。
总结
通过上面的步骤,我们完成了一个功能完整的轮播图。这个轮播图具有以下特点:
支持无限循环滑动
显示当前页码
有良好的加载状态和错误提示
代码结构清晰,易于修改
你可以在这个基础上继续添加新功能,比如点击图片跳转、不同的切换动画等。希望这个指南对你学习Flutter有所帮助。在实际项目中,记得根据具体需求调整代码,确保用户体验流畅。
本文内容仅供个人学习、研究或参考使用,不构成任何形式的决策建议、专业指导或法律依据。未经授权,禁止任何单位或个人以商业售卖、虚假宣传、侵权传播等非学习研究目的使用本文内容。如需分享或转载,请保留原文来源信息,不得篡改、删减内容或侵犯相关权益。感谢您的理解与支持!

